9.30.2009
Feelin' crunchy
7.12.2009
Breathing fresh air
4.26.2009
On a baking frenzy
These past fourteen months I have researched, studied, written to, interviewed with, and visited dozens of graduate programs. The hundreds of hours preparing for exams, writing essays and talking with professors, as well as the astronomical costs of the application process have finally come to fruition. This summer, Alex and I will finally be moving to a town where he can pursue his passions with international sociology (including food systems and "green" economies) and where I can explore my interests in the law (workers' rights, environmental justice and civil rights.) After the many harried late nights on the subway plotting essay outlines on the back of advertisements found in am New York, I am finally DONE with the process! Last week, Alex and I officially accepted our offers from our respective graduate programs, and we will be relocating to our new town in just a couple of months.
The denoument of our quest to find "just one good option together" has finally played out, somewhat anti-climactically given the length of our seaerch. Just a couple of weeks ago, we visited the town to make certain it was the right choice, and after a day of torrential rain, the clouds parted for our first truly beautiful day this year. It was a warm welcome from our future home, whose brick townhouses smiled down at us. I snapped this parting shot from a passing window to remind me of the new town's charm. It will be hard to leave Brooklyn and her many offerings, but we hope to set up a more comfortable, greener home in our new place.
This recipe is my last from the oven for a while. Its flavors and textures are a perfect balance for a savory meal, and it will definitely make an appearance come autumn. Autumn, when I will once again see the swirling fallen leaves from a student's perspective. I can't wait.
(Adapted from Gluten Free Baking Classics)
1 cup cornmeal
2/3 cup brown rice flour
2/9 cup potato starch flour (no, that's not a typo, the recipe calls for 1 cup "mix" which is 2 cups brown rice flour, 2/3 cups potato starch flour, 1/3 cup tapioca flour, so I divided it by three)
1/9 cup tapioca flour
1/2 tsp. xanthan gum
1/4 cup sugar
3 1/2 tsp. baking powder
1/4 tsp. salt
1/4 cup canola oil
1 cup milk minus 1 Tablespoon
1 large egg, well beaten
3/4 cup extra sharp cheddar cheese, grated
Pinch or two of red pepper flakes
1. Preheat oven to 400 degrees. Lightly grease muffin pan (makes 9) or 8" round cake pan.
2. Mix dry ingredients in a medium bowl. In a small bowl, mix wet ingredients, then add to dry and stir gently to combine. Do not over-mix. Stir in cheddar cheese and pepper flakes.
3. Pour batter into prepared pan and bake about 25 minutes (pan) or 20 minutes (muffins). Remove from pan and serve immediately.
This is best warm and fresh, but leftovers can be sliced thinly and grilled with melted cheese or fried egg for a delicious brunch treat. We liked melting additional cheddar cheese inside, and served it with grilled BBQ tempeh and collard greens. I hope it brings you comfort too!
4.25.2009
Gobbled up banana bread
Famous Chocolate Chip Banana Bread
3/4 cup brown rice flour
1/4 cup ground flax seeds (for texture and Omega-3s)
1/2 cup tapioca flour
1/2 cup potato starch
1 teaspoon xanthan gum
3/4 cup sugar
1 teaspoon baking soda
1 teaspoon salt
1 teaspoon cinnamon
1/4 teaspoon nutmeg
6 tablespoons unsalted butter, melted and cooled slightly
2 large eggs
1 1/2 cups mashed banana (about 3 large bananas)
1/4 cup yogurt (I used fat free vanilla and it was fine)
1 teaspoon vanilla extract
3/4 cup semisweet dark chocolate chips
1/3 cup crystallized ginger
1. Preheat the oven to 350°. Grease a loaf pan. Melt the butter on low heat. Set it aside to cool.
2. Sift together the flours and add xanthan gum, sugar, baking soda, and spices in a large bowl. Mix well.
3. Mix together the mashed bananas, eggs, yogurt, butter, and extract in a large bowl until just combined. Now sift the dry ingredients into the wet, avoid over-mixing. Stir in chocolate chips and candied ginger pieces (I chopped mine to 1/4" bits). Smooth out the top of the loaf.
4. Bake about 45 minutes, or until knife inserted comes out clean and the top is golden. Let set 10 minutes before removing from pan, then cool before slicing. As GF Girl notes, it's pretty hard to wait.
4.04.2009
Parchment Paper and Martha
This month's Martha Stewart Living has a delicious recipe for coconut macaroons--featuring, of course, parchment paper--which just seemed right for this blustery nigh-on-spring Saturday afternoon. The crisp exterior and chewy insides of these little morsels are both light and indulgent. I made a double batch to bring to a friend's birthday party, wrapped in a brown paper box with dotted tissue paper.
I am huge fan of Martha Stewart, although I know many love to hate on her, but I really admire her sensibility, creativity, and vast knowledge of all things domestic. She's also incredibly outspoken and doesn't take any b.s. And she knows her cookies. Trust me, these are incredible! The crunch from the almond pieces and the little spots of coarse sea salt add a refined texture to this simple dessert. I highly recommend them, just in time for Passover, and they are super simple to make.Martha's Coconut Macaroons
(makes 16)
2/3 cup sugar
2 egg whites
2 cups unsweetened coconut flakes
1/4 cup almonds, coarsely chopped
1 tsp. vanilla extract
1/2 tsp. almond extract (my addition)
Pinch coarse sea salt
1. Preheat oven to 350. Line a cookie sheet with parchment paper.
2. Whisk together the egg whites and sugar in a large bowl until well combined.
3. Add the rest of the ingredients. Stir well.
4. Form into 2 Tbsp-sized mounds (you can really pack it together in your hands) and place 8 on each cookie sheet.
5. Bake about 15 minutes until golden on the bottoms and sides.
6. Cool 5 minutes on the cookie sheets and then transfer to a wire rack to finish cooling.

3.28.2009
Spring is here!
Can you believe this decadent, delicious dessert is totally gluten-free? I brought the leftovers to work where it was devoured in less than an hour (at 10:00 in the morning). No one knew it was GF and all plates were cleaned. I think it’s the combination of brown rice flour and walnuts and carrots that gives this dense cake the substance often lacking in GF baked goods. And lemony cream cheese frosting doesn’t hurt either.Read up and enjoy! It’s simpler than the long ingredients list makes it seem. However, starting with the best, freshest organic produce and dairy really "puts the pants on it," as my mom says. Look how healthy these free range organic eggs are, so richly colored. I remember when we had white, uniform Eggland's Best eggs with the red stamp on them. I hate to think the lives those chickens lived. These eggs look like they came from my grandmother's farm.
Carrot Cake – makes 2 layers from Gluten Free Baking Classics, by Annalise Roberts—my new favorite cookbook for all things previously forbidden2 cups brown rice flour
2/3 cup potato starch flour
1/3 cup tapioca flour
1 ½ tsp xanthan gum
2 tsp. baking soda
1 tsp. salt
2 tsp. cinnamon
½ tsp nutmeg
2 cups granulated sugar
1 ½ cups canola oil
4 large eggs
2 tsp. vanilla extract
1 cup chopped walnuts
1 cup shredded coconut
2 cups peeled, grated carrots (about 6 medium carrots)
Check out the vibrancy of my juicy organic carrots!
1. Preheat oven to 350. Line two 9” round pans with parchment and lightly oil. 2. Combine dry ingredients, flour through nutmeg, in a medium bowl. Set aside.
3. In a large bowl, beat eggs, sugar, and oil about 1 minute. Add vanilla and mix well.
4. Add dry to wet and beat on medium about 4 minutes. Fold in carrots, coconut, and walnuts.
5. Pour batter into prepared pans and bake about 40 minutes, until toothpick comes out clean.
6. Cool on rack for 10 minutes (in the pans). Use a knife to separate from pans and flip layers onto rack to finish cooling (peel off parchment).
7. DO NOT frost warm layers, as the icing will ooze and run all over the place. It’s delicious but not so pretty. Once it’s completely cooled, place bottom layer on a cake stand and frost its top. Then lay the second layer on top and frost the top and sides. Sprinkle an additional 1/2 cup toasted coconut flakes (spread in a pan and baked 3 minutes at 350) over the top and sides.
Cream Cheese frostingThe real reason we all eat carrot cake. I made mine with a Meyer lemon and it was heavenly, fit for a queen.
½ cup unsalted butter, room temperature
½ cup low fat cream cheese, also room temp
3 cups confectioner’s sugar, sifted
1 tsp. vanilla extract
1 lemon, zested and juiced
1. Beat butter and cream cheese in a large bowl until light and fluffy.
2. Beat in sugar at low speed until blended, then add vanilla, lemon zest, and lemon juice. I immediately frosted my cake, but I think it would have been easier if I had chilled the icing so it stayed put between the layers. Be sure to add lots of icing to the middle, as that really makes the look of each slice. This is both very sweet and fairly tart, so balance the flavors to taste.
The cake has a beautiful moistness and a satisfying crunch from the walnuts and coconut. I would definitely make it again, but might do only one layer since two was far more cake than Alex and I could manage in the 3-4 days it keeps in the fridge. It would be a lovely brunch piece or dessert for a baby shower or daytime event. I would like to try it in mini cake pans for individual servings, since it avoids the messy slicing process. It’s not crumbly, like traditional GF desserts though. I think I just need a cake server :)2.16.2009
A Homemade Valentine's Day
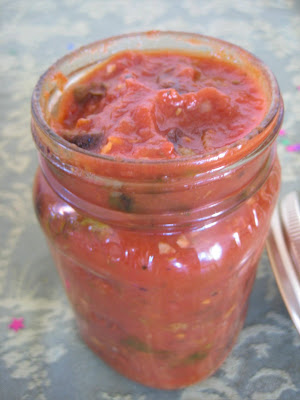
This year, having already gone on our annual adventure (to the Craving something spicy, romantic, and succulent, we selected a puttanesca sauce based on a Jamie Oliver recipe, ripe with crushed red chilies, fresh olives, and tart capers. We simply made both normal and gluten-free pasta so we could both enjoy the main dish (and doubled the recipe for plenty of leftovers--note the reused mason jar of deliciousness below).
Puttanesca Sauce (minus the anchovies)EVOO to coat the pan
2 cloves of garlic
2 handfuls black and/or kalamata olives, pitted and halved
½ a jar of capers, drained
2 dried chili peppers, crushed
½ tsp. dried oregano
1 (28 oz.) can of diced tomatoes
Salt and pepper, to taste
Large handful of fresh basil leaves, torn
Drizzle of EVOO to top off each portion
Heat the EVOO in a large saucepan, then saute the garlic through oregano for a few minutes. Add the tomatoes and simmer for 10 minutes. Turn off the heat and toss in the basil, stir and drizzle with olive oil. The salty, sexy olives just burst in your mouth, and the spicy tomato base makes this a delicious romantic meal. The handfuls of freshly torn basil leaves tossed in at the end bring a light finishing flavor to the rich sauce (which we quickly cleaned from our plates). A simple spinach and goat cheese salad balanced our meal and prepped us for the richness of dessert.
In keeping with the rustic Italian theme, I found a recipe from the Ottolenghi cookbook(in Gourmet Magazine) for an orange polenta cake that uses almonds and polenta as the main flours. With a minor substitution of ½ GF flour for all-purpose wheat flour, I easily adapted it to be gluten free and just as delicious. The rustic quality of the flours and polenta combined with the heady flavors of orange and almond make it a perfect mid-winter treat.
The cake is layered with first a rich caramel, then juicy slices of navel oranges, then the batter (it comes out like an upside-down cake). Once it is cooked and inverted, you drizzle a marmalade glaze over the top which seeps in, infusing every bite with a moist orange flavor. To top it off, Alex made fresh whipped cream with orange extract, and we served a bit of glaze on the plates. It was phenomenal, if a bit of a sugar overload. This morning, we had slices for breakfast, and it was a perfect scone-like delicacy. Definitely a make-again, especially for brunch or an elegant tea time (which I've never had, but which I'm sure some people put on).
Preheat the oven to 350 degrees. Grease a 9” cake pan and line it with parchment paper.
For the caramel layer, simmer together in a small saucepan:
½ cup superfine sugar (process granulated sugar for a minute or so)
2 Tbsp. water
2 Tbsp. unsalted butter, cut to bits
2 oranges, zest reserved for cake batter, sliced horizontally (peel and pith cut off)
Simmer the sugar and water together over med-hi heat, swirling and washing down any sugar crystals that form on the sides with a pastry brush dipped in water. It will take a few minutes before the sugar dissolves and the mixture colors amber, but watch it carefully (my first batch burned and I had to start all over, what a waste!) When the mixture turns to caramel, remove from the heat and add the butter and swirl to combine.
Quickly and carefully pour into the prepared pan and tilt to coat the bottom. Spread orange slices in concentric circles across the caramel layer. This will be the top of the cake, so arrange them carefully for a nice design.
1 ¾ sticks butter, softened
1 cup superfine sugar
3 eggs
zest of both oranges
1 tsp. orange extract (or 2 tsp. orange flower water)
½ cup all purpose (GF) flour
1 tsp. baking powder
½ tsp. salt.
2 cups of ground almonds (I put raw almonds in the food processor so they were still a bit coarse, which worked well with the texture of the polenta)
2/3 cup quick-cooking polenta
Cream together the butter and sugar in a large bowl until combined. Add the eggs, one at a time, until well mixed. Add the orange zest and the orange extract. Whisk together in a dry bowl the flour, baking powder, and salt. At a low speed, add the dry ingredients into the butter/sugar mixture. Blend in the ground almonds and the polenta to just combine.
Spread batter evenly over the orange slices in the cake pan and bake until a knife inserted in the middle comes out clean and the top is golden, 1- 1¼ hours. Let cool 5 minutes and then invert onto a cake plate. Serve warm or at room temperature.
¼ cup orange marmalade
2 Tbsp. water.
Drizzle a bit over the top and sides of the cake. It’s pretty sweet, so go easy if you don’t want a very sugary dessert. You could also cut back on the sugar in the cake, if needed. A tart marmalade would work really well too.
For the orange whipped cream, mix on hi:
Whipping cream, powdered sugar, and orange extract, to taste.
It was a perfect, if gluttonous Valentine's Day, enhanced by the joy of selecting and preparing our meal together, and savoring each bite without the hectic or hurried atmosphere of a NYC restaurant. Although I believe it's silly for Americans to focus on only one day each year to be romantic, I did enjoy our celebration and look forward to many other weekend nights where we can take time out to share our joys (and food).
(Beneath the Arc du Triomphe 2/14/08)
9.16.2008
Kitchen competition
Double chocolate-coconut cookies
Makes 4 dozen 2” cookies
1 cup packed light brown sugar
1 tsp. baking powder
½ cup salted butter, softened (1 stick)
2 eggs
2 tsp. vanilla extract
1 cup potato starch flour (a very fine, light flour)
½ cup white rice flour
½ cup cocoa powder
½ cup semisweet chocolate chips
½ cup coconut flakes
Splash of milk, as needed, to moisten the batter
1. In a large bowl, beat the first three ingredients with a mixer until creamy. Add the eggs and vanilla, beat on low for 1 ½ minutes. Add the flours and cocoa powder, beat on low for 1 minute. Stir in chocolate chips and coconut flakes.
2. Cover and refrigerate for 1 hour or overnight to stiffen the dough so the cookies won’t spread too much on the pan. Preheat oven to 375, lightly grease a baking sheet.
3. Drop rounded teaspoons of dough on the cookie sheet and bake for about 8 minutes, until slightly firm around the edges.
4. Immediately remove from cookie sheet and transfer to a cooling rack (but be sure to eat some while they’re good and hot!) These are spectacular warm, dunked into milk.
8.17.2008
Fresh start in the kitchen
I am wonderfully blissed out from my vacation, and instead of hitting that post-holiday depression yesterday, I was surprised with a wonderful gift: a new stove! Since we moved here in March, we have been cooking on a mini-stove with 1 1/2 working burners (out of four!) and an oven that frequently extinguished itself and would pump extra gas, making a "tick tick tick" noise, when the pilot would try unsuccessfully to re-ignite. To top it off, the oven dial was completely worn off, so that we had to guess temperatures by dividing the circumference in reasonable fractions of 25 degrees. I am not a geometrist, nor am I a chemist, so this left a lot of guesswork in baking. But yesterday, our building super surprised us with a brandy-new stove complete with FOUR functional burners and an oven dial in crisp, clear numbers.
2. Combine all ingredients except nuts and fruit, mix well.
3. Stir in nuts and fruit
4. Pour into prepared muffin tin. Bake 12-15 minutes, until peaks just start to brown.
5. Let set 2 minutes in pan, then separate from tin with butter knife and remove to cooling rack. Bon appetit!
7.16.2008
Real true delicious pizza!

After the first agonizing two weeks without wheat, most of my painful cravings ceased and I adjusted to my new diet. In the first few days though, I was a mess to be around; all I could think about was the food I couldn't eat, and when I closed my eyes, I actually saw buttery crackers, foccacia bread, coffee cakes. I went cold turkey and didn't have any supplements yet, so I was pretty hungry to boot. It wasn't until I trekked up to the health food
store a mile north of our apartment and discovered a box of GF cookies that I found some relief. Needless to say, they were gone by morning!Having mostly adjusted to the realities of my diet and embraced all my options, I still find myself craving the chewy-crisp texture of good bread soaked in olive oil or steaming with melty butter. When Alex made me this pizza last week from the Whole Foods mix, I felt guilty with pleasure. The crust is so perfect---either thin or as a deep-dish pie--with its tender inside and firm crusty exterior (which I promptly soaked in excellent olive oil). We topped it with some homemade tomato sauce, a combination of mozzarella, parmesan, and manchego cheeses, and fresh tomatoes and basil, but anything would be amazing on this base.
Alex's pizza:
Makes two medium pizzas (serves 4)

1 package Whole Foods GF pizza crust mix, prepared
2 cups homemade tomato sauce
2-3 cups grated cheese of your choice (we did 1/2 mozz, 1/4 manchego, 1/4 parm because that's what we had in the fridge)
1 sliced tomato
1 cup fresh basil, washed
1. Prep dough, let rise 30 minutes.
2. Make tomato sauce (see below)
3. Arrange dough in a 9" cake pan for deep dish (above) or spread onto cookie sheet for thinner crust (top image). Spread half sauce across dough, to taste, and add cheeses, then arrange tomato slices and basil on top.
4. Bake at 350 for 15-20 minutes, until it's ooey and bubbling. You do not have to pre-bake the crust, so it's a pretty quick meal from start to finish. Devour immediately!
6.23.2008
Peanut Butter
Last night, I created a cookie version of that snack, basing my recipe on a variation of these PB cookies, and I have to say I prefer them to the floured variety I grew up with. These are so chewy and moist, but flaky too. The only problem with them is trying not to eat the entire batch at once.
Black-eyed Peanut Butter Cookies
Makes 3 dozen 2" cookies
1 cup good peanut butter (I used crunchy organic)
1 cup white sugar
1 tsp baking powder
1 egg
1/2 tsp vanilla
1/2 tsp cinnamon
dash nutmeg
dash cloves
(dash of salt if your PB is unsalted)
Extra white sugar to coat (if you please, it's extra sweet)
1/4 cup dark chocolate chips (like Ghirardelli)
1. Preheat the oven to 350 degrees. Line a cookie sheet with parchment paper.
2. Cream together the peanut butter and sugar in a medium bowl. Beat in the baking powder and egg until well mixed. Add the vanilla and spices, combine.
3. Shape the dough into approx. 1" balls, gently toss in extra sugar (if desired, they will be really sweet), then place on prepared cookie sheet. Flatten each ball with a fork. Press 1 large chocolate chip in the top of each cookie, if desired.
4. Bake about 10 minutes, until golden on the edges. Cookies will be very puffy and soft to the touch. Let cool 5 minutes on the pan before transferring the parchment to a counter to cool another 10 minutes. (This cooling process is crucial for letting the cookies firm up, and the wait is worth it.)
Enjoy!


